How to Hang a Tool Handle (Improvise for Success)

How to hang a tool handle

The tool in the image above is actually one of the lesser known but still essential woodworking tools. Unlike the ax, adze and sledgehammer, the froe is not as universally known. 

The froe is a long, bladed tool affixed to a wooden handle to which it is set perpendicularly. Froe are used for riving (sometimes called splitting) which is the process of separating wood fibers along the grain.


Riving has many advantages over mllling or sawing, which conversely are the processes of cutting across the grain – but that is a topic for another blog. 


Froes are typically made to cut long, then shingles. They, like axes, hatches, sledgehammers, and other such tools, must be mounted to their handles in a reliable manner. 


A bad “hang” will result in a broken handle, a deformed tool head, or just a failure that causes the separation of the head from the handle, which can be dangerous. 


Unfortunately for me, this froe came to me from the factory with a horrendous hang job. 


Instead of being wedged on the handle, the head had a tapped hole through which a screw was used to secure the head to the haft. 

Using a froe requires beating on it with a maul or a mallet. The joint between the head and handle is under immense stress during use. In case you were wondering, screws are entirely insufficient fasteners for a froe head-to-haft junction. 


After using the froe for a bit (I use it to rive shingles for making birdhouses and hearthboards) the screw securing the head sheared right off. I drilled a new hole, got a longer screw, and wouldn’t you know the same problem happened all over again. 


The evidence of both sets of damage is apparent in the picture below 

How to hang a tool handle
This is the original handle that came with my froe. As you can see, a set screw is not a good way to fix the head of a tool that's intended to be struck with a maul...

At a certain point, I said enough was enough and went scrounging among my scraps to find a better handle on which to hang the froe head. 


Here’s what I did, and how it’s done. 


Remove the Old Handle


First things first, I had to remove the old handle. Fortunately, this is pretty easy for a tool whose head is secured with a screw. I just backed it off the handle. 


In my case, however, I had tried to hang the head using a hardwood (white oak) wooden wedge. 


This was a bad idea and resulted in a poor hang with voids which I had to remove and rectify (details on this below) 

Pictured: NOT how to hang a tool handle
The problem with this hardwood wedge is that it wouldn't properly expand outward against the eye of the tool, leaving voids which ultimately resulted in a loose hang. I had to redo it.

To fix this poor hang, I had to saw the head off and then use another piece of wood and a maul to punch out the faulty handle section, the hardwood wedge, and the steel safety wedge, which I was able to reuse. 


At this stage, all you’ll have is a loose tool head. 


Select a New Handle


Now, you need to find a new handle to hang your tool head out. As a general rule, the best thing to look for is a handle that can slide partially through the eye of the tool, but down which the tool head can’t slip any further. 


That is, you should be able to slide the tool head onto the handle but only so far. 


My words to the wise are these: never throw out your old tool handles. 


I have to split a decent amount of wood where I live, which I do by hand. As you can imagine, I run through about a sledgehammer handle per year. 


I have a small collection of partially broken tool handles lying around. 


One of my old half-broken sledgehammer handles was perfect for the job. 


I resized the old sledgehammer handle by cutting away the section that was cracked. It was perfectly sized, as you can see in the picture below. 

How to hang a tool handle.
This old sledge hammer was more or less the right size and shape for the eye of these froe. It's honestly not perfect, but it'll do for an improv job, and that's what this is about.


Size the Handle for the Head, Cut a Channel for the Wedge 


After you’ve selected a new (old, in my case) handle, you need to size and profile the section of the handle which will fit through the eye of the tool. 


You want the cross section and width of the tool handle to correspond to the eye almost perfectly. It should be difficult to drive the handle through the eye, and the eye should fill all of the space in the eye.


Get it as close as you can without testing it, and then cut a channel across the haft, as deep as the height of the tool head, and then a little bit deeper. 


As you can see in the following picture, the tool handle is just about the same shape and width as the eye. 

The channel cut for the wedge and prepared for hanging.


I had to cut this channel without a vise or a guide. It’s not perfect or even, but it’ll get the job done.

How to hang a tool handle.


Slide the Tool Head Over the Haft  

Next it’s time to start the process of actually setting the tool head on the new handle. You shouldn’t be able to do this easily. It should be hard to get the handle through the eye. You want as much friction as possible. 


If it’s hard to get the head on the handle, you’re doing something right. 


As you can see in the short clip below, I use a maul to set the head on the tool handle. It takes quite a few strikes to get the handle set. 

Use a maul or a dead blow hammer for this, not a hammer with a metal head. Metal on metal is damaging to both tools. The wooden maul is much softer and is able to deliver the same force (or more) with far less impulse, which is much safer for the froe I’m trying to rehandle. 


Once the head is set on the tool handle, turn the tool over, rest part of the head on a block, and strike the bottom of the haft sharply. This will continue to push the tool handle up through the eye until it protrudes slightly through the eye, as you can see in the image below. 


How to hang a tool handle.
Hammer the tool handle through the eye until the handle protrudes slightly through the eye of the head.


Now, let’s take a look at how well the handle fits the eye before a wooden wedge is inserted.

How to hang a tool handle.
The handle of the tool should nearly fill the eye of the tool head. Minor voids are acceptable at this point as long as they disappear once you set the wooden and steel safety wedges.

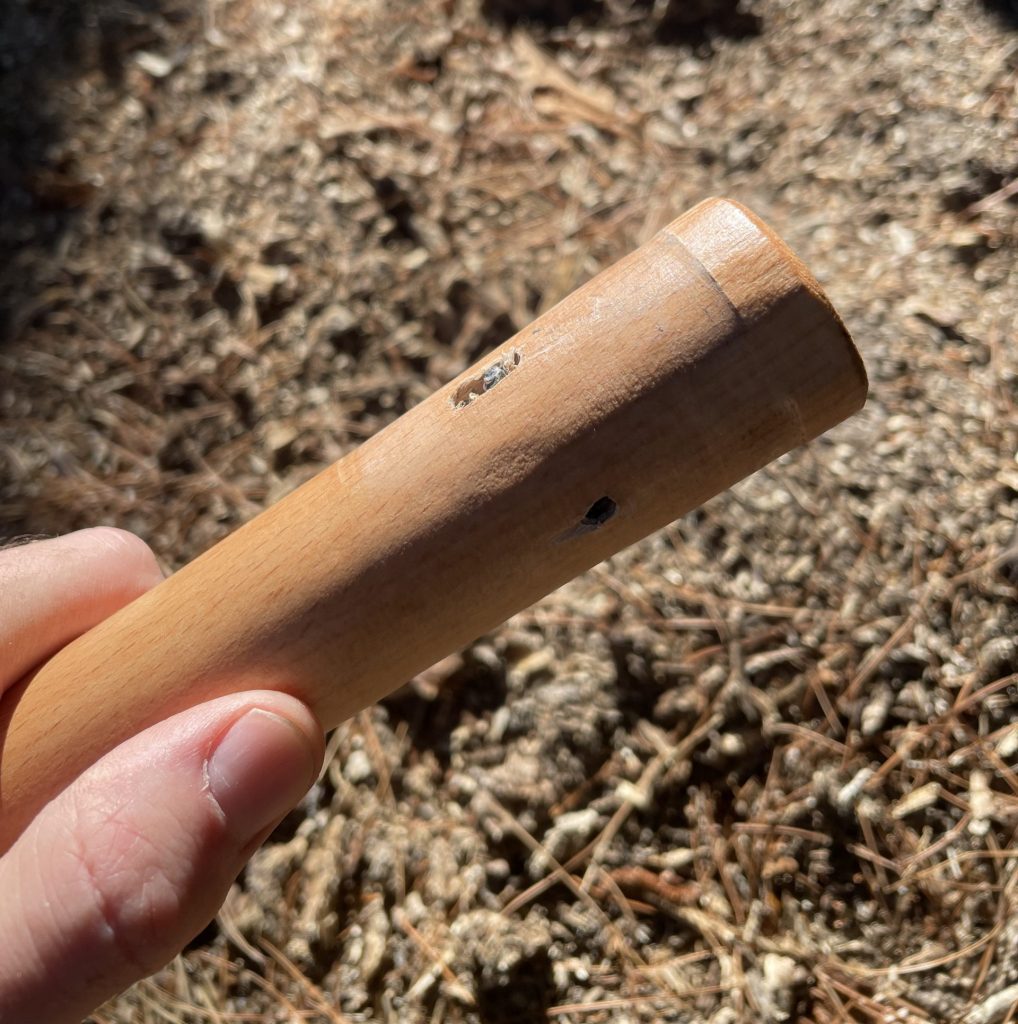
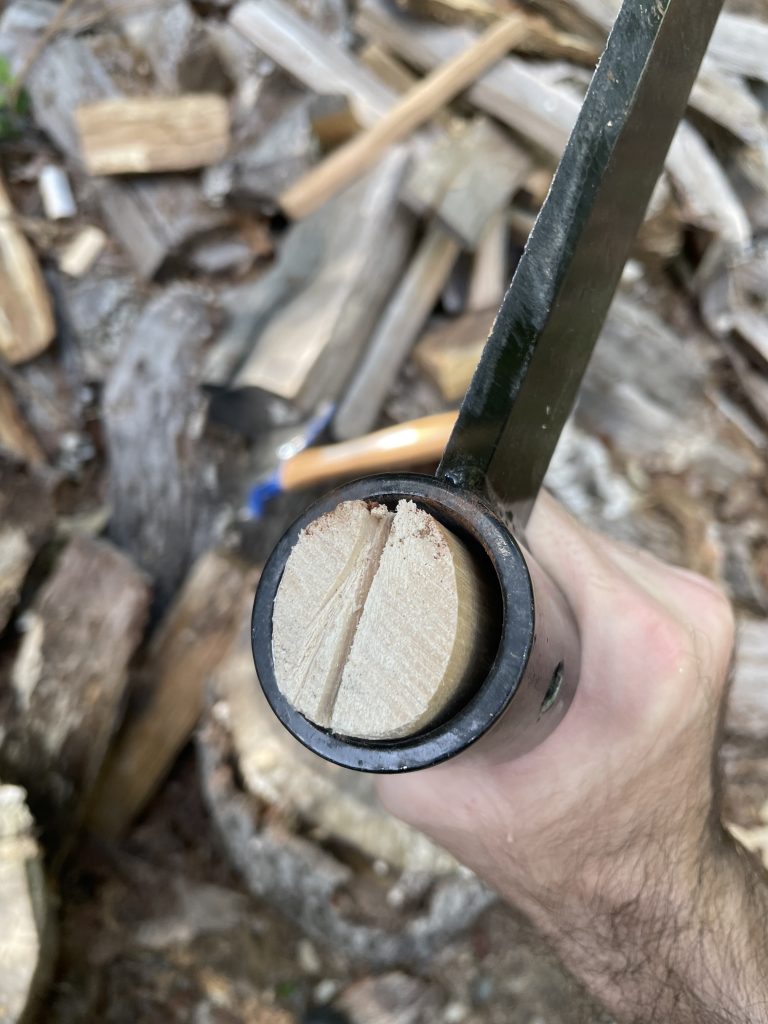
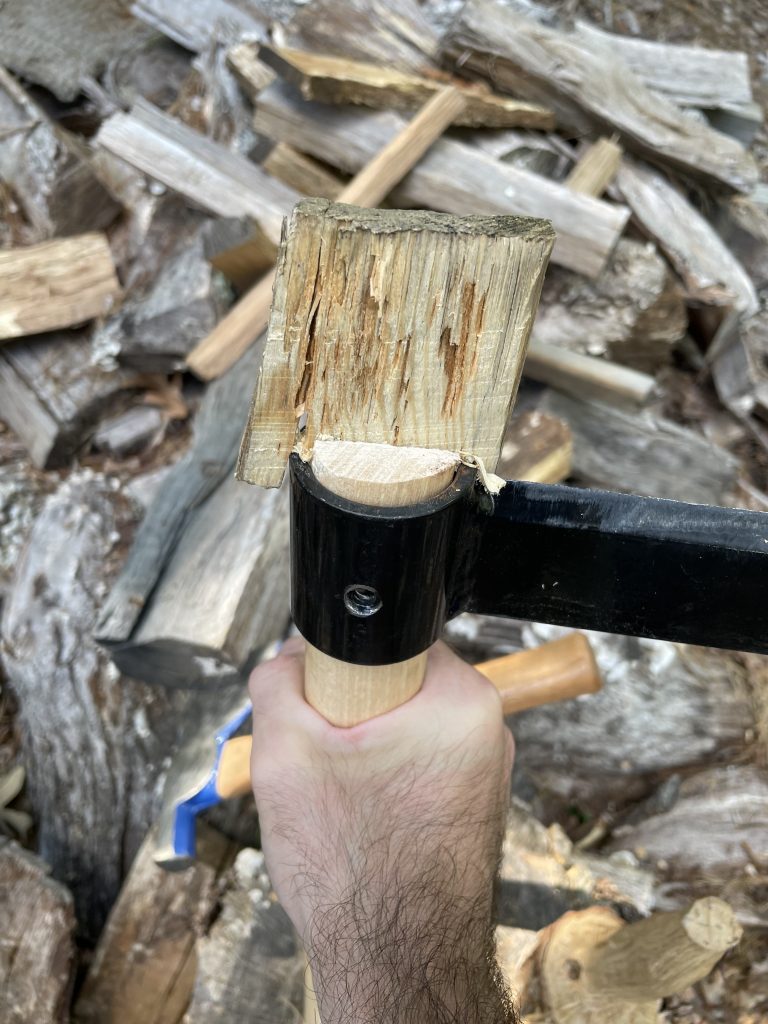
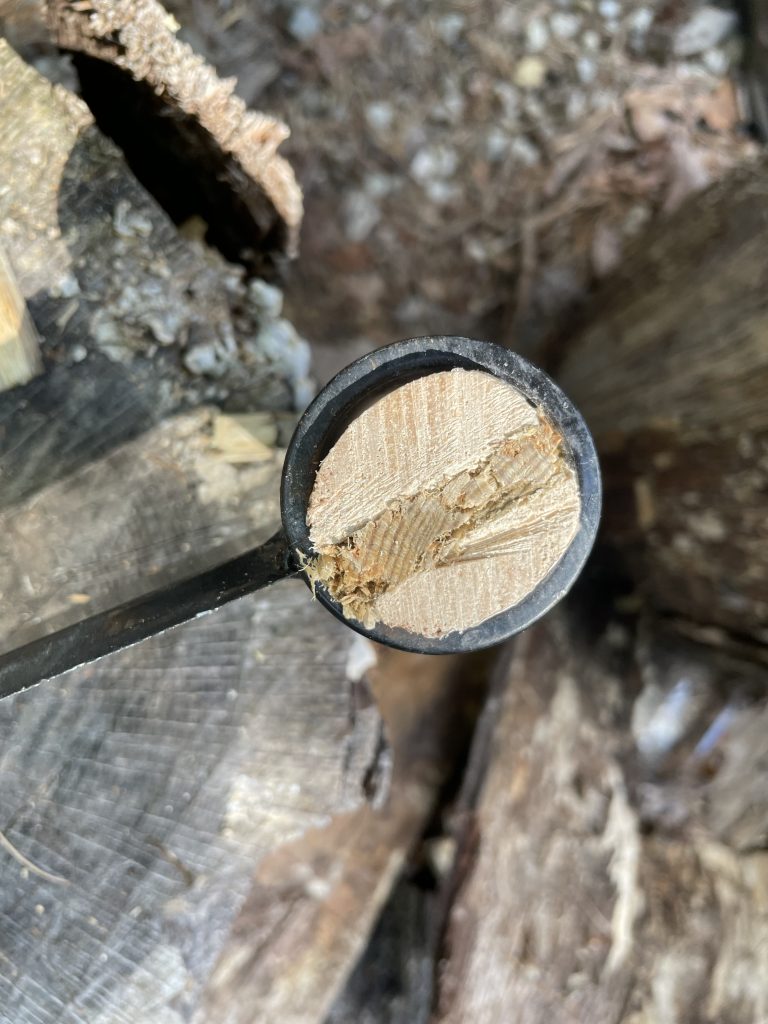
This job is not perfect, as you can see there are slight voids at the edges of the tool handle within the eye. This means you can see a little bit of a gap between the eye of the tool and the handle. 


This isn’t a good thing, but it’s pretty minor in this instance and once I drive the wedges in (as you’ll see) there will be no space. 


The reason you don’t want any voids is because this creates a weak interface between the tool and handle. If there are gaps, it means that the head could theoretically slip off the handle. You want the handle pressed as tightly against the walls of the eye as is mechanically possible. 


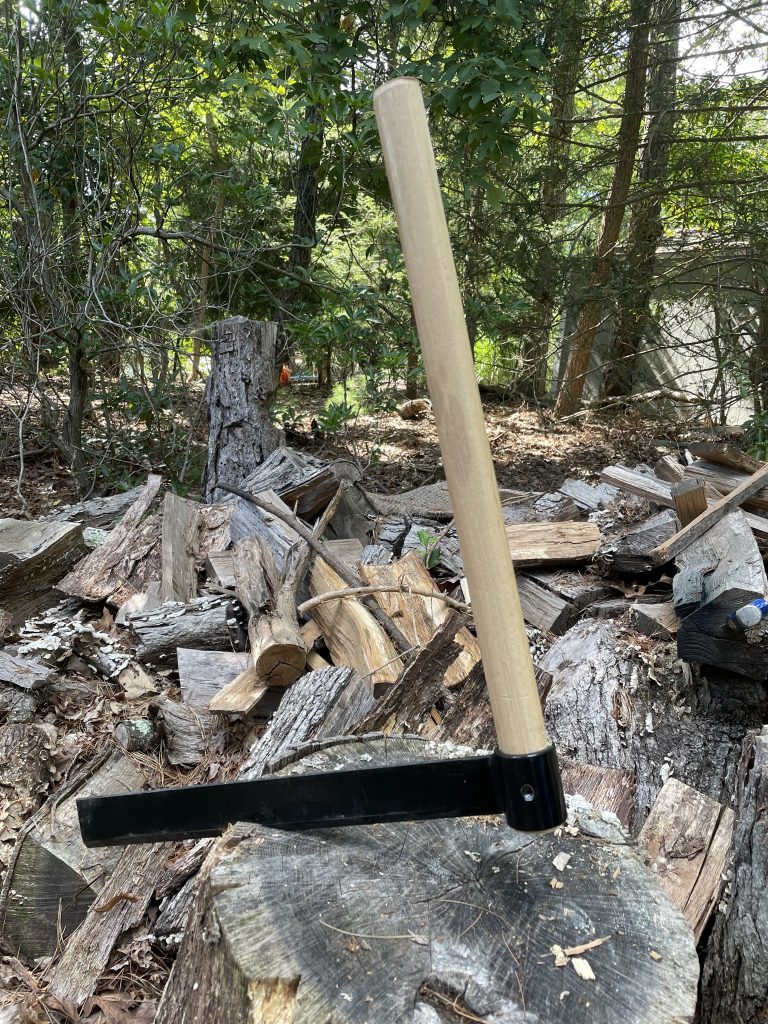
To be fair, I’m improvising this process with what I had in the garage and in the yard. All of my parts and pieces are jury-rigged to some degree, so for the purposes of this post, it works. I’m attempting to show you that you don’t need to make a trip to the hardware store to hang a tool handle. You can probably make-do with what you have, just like I do.


Prepare a Wooden Wedge


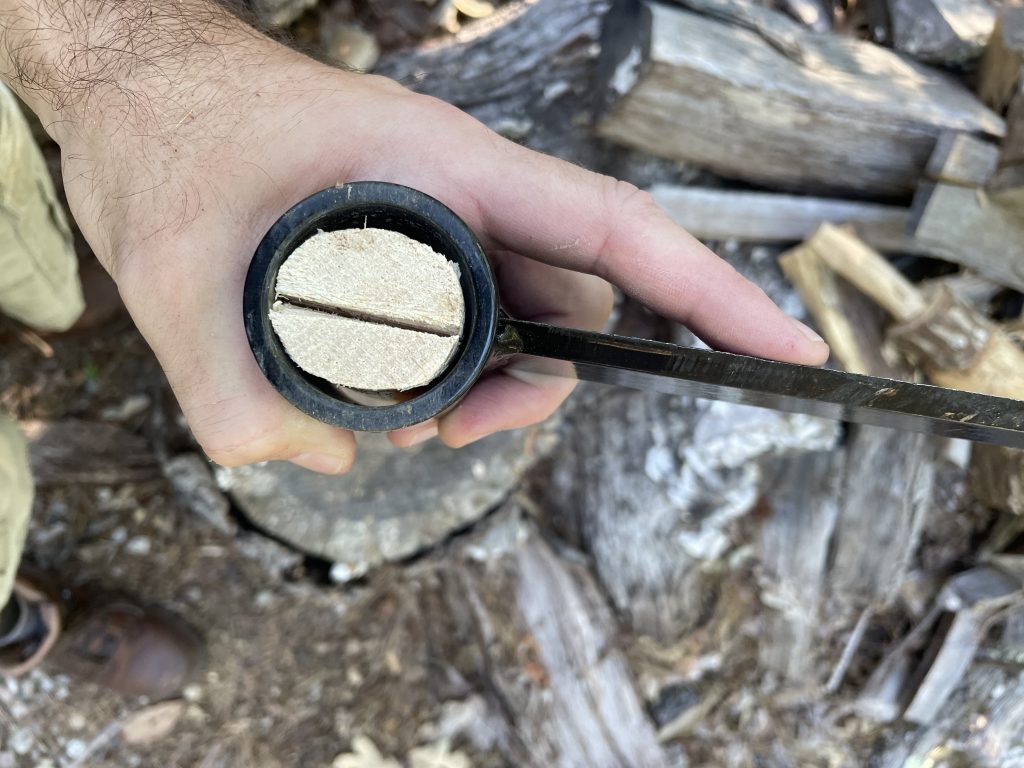
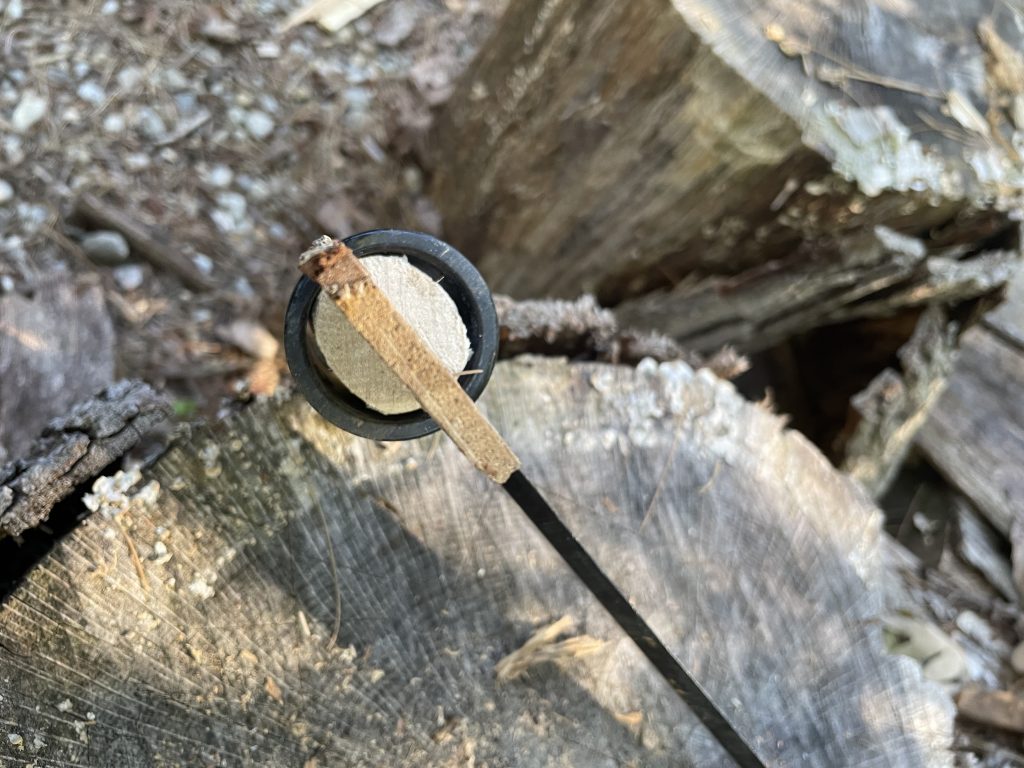
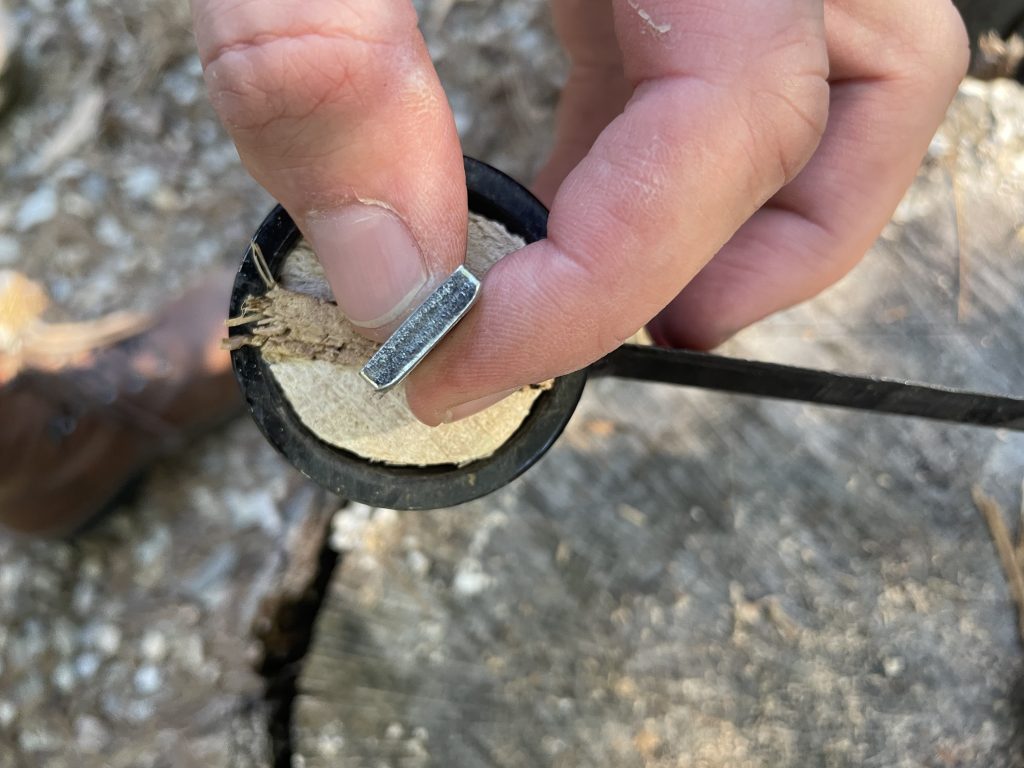
Now that you have the tool handle set within the eye, you need to prepare a wooden wedge. You can buy these at most any hardware store (and probably online but I didn’t check), but I live pretty much in the woods and paying for a wooden wedge when I can make my own is absurd. 


The first time I rehung this froe, I made the mistake of carving a wooden wedge from hardwood (white oak).


This was a mistake and I was foolish for thinking I could get away with it. You should always use softwoods to make wooden wedges to hang a tool handle because softwoods can be easily deformed and are more plastic than hardwoods. 


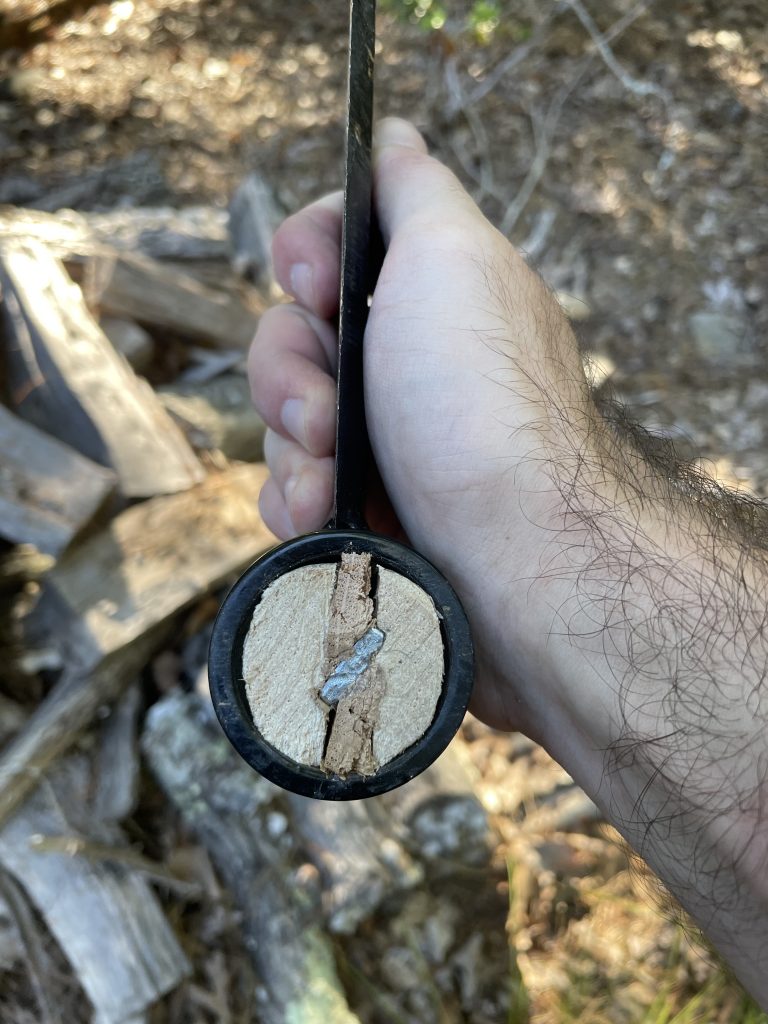
When I hung the froe the first time and used the white oak wedge, when I drove in the steel safety wedge, instead of fluidly displacing the wedge against the sides of the handle within the wedge handle, all that happened was the oak cracked and left voids. 

The oak was too structurally sound to deform and press against the sides of the handle. As a result, I was left with a weak hang job that, while it was not structurally sound enough to use for riving, was still a pain and a half to remove. 


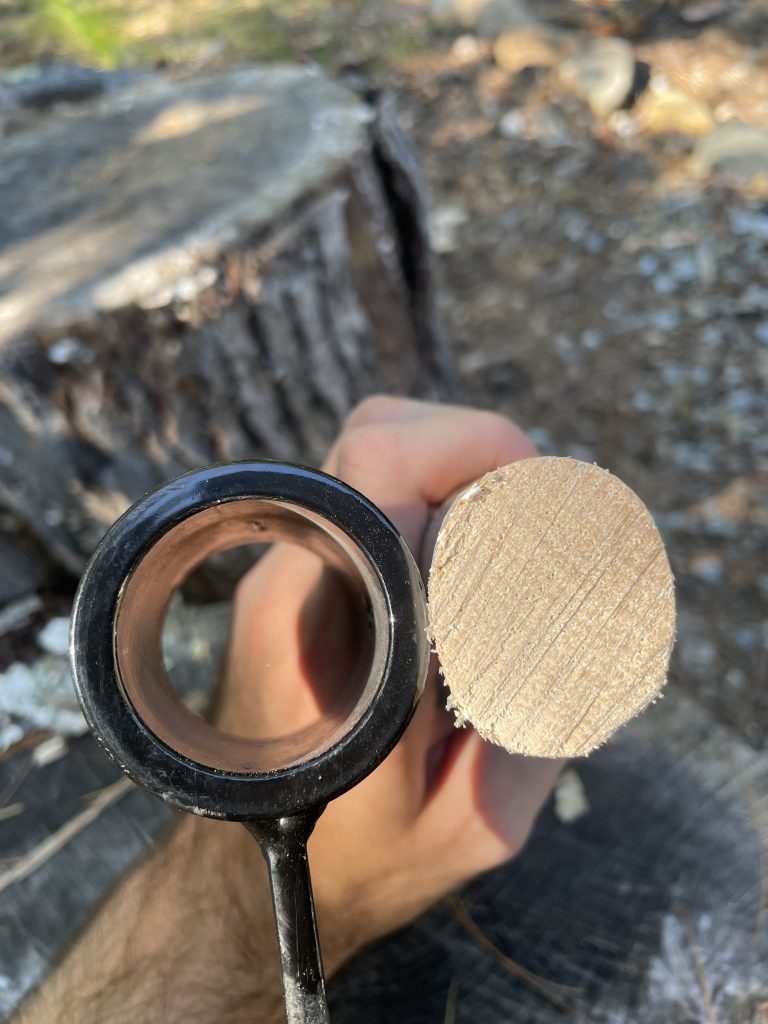
At any rate, I succeeded (with much expense of sweat and annoyance) at removing the oak wedge and that section of the tool handle so I could try again.


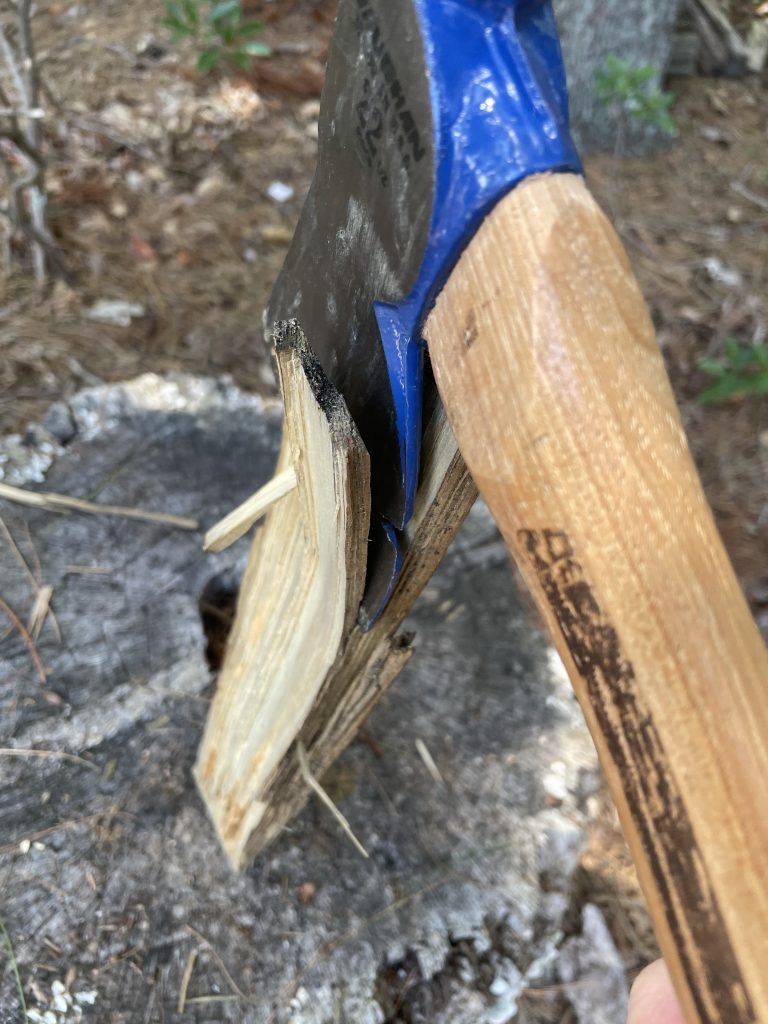
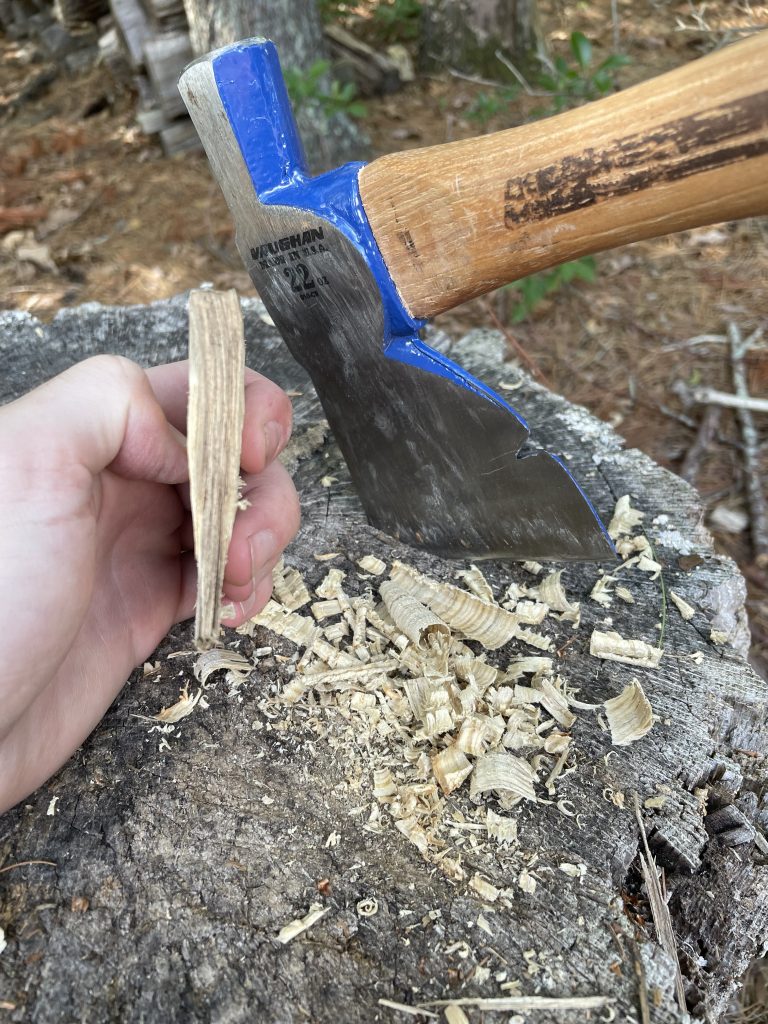
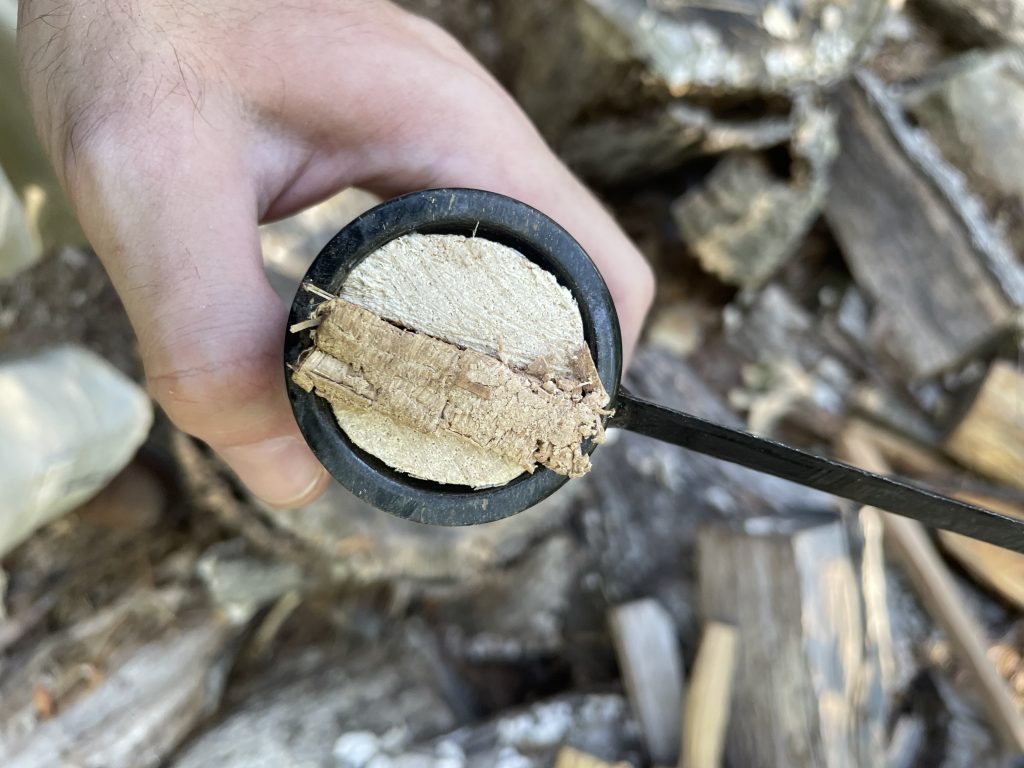
This time, I used a bit of white pine. 


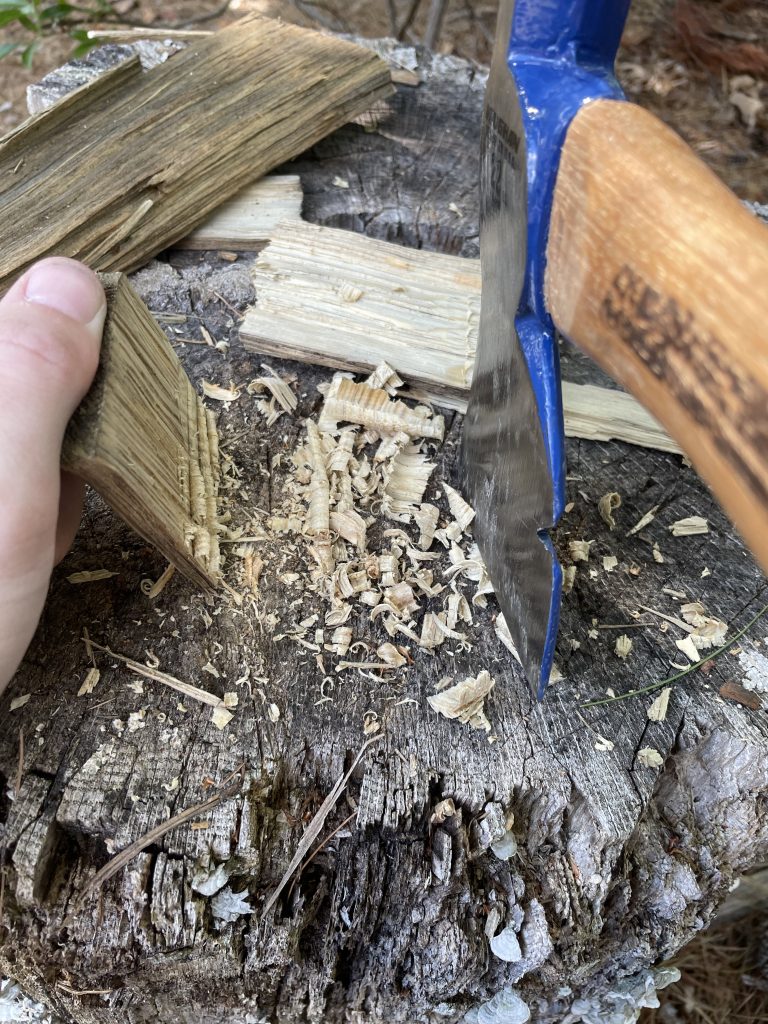
I started splitting away a small wedge from a larger piece of stock using a hatchet.

How to hang a tool handle.
You can buy wooden wedges but in the spirit of improvising, salvaging, and doing as much yourself as possible, I cut my own from a piece of old white pine that was sitting in my firewood pile.

Then, continuing with the hatchet, I started paring away at the bit of pine until it started resembling a wedge and not a slab.

I continued paring away the wedge until I was happy with the finished product.

The wedge, basically read to set in the handle of the tool. Not perfect (far from it) but we're improvising here.

Above is the wooden wedge, finished and ready to be driven into the top of the tool handle. 

A few notes on making your own wooden wedges for hanging tool handles. One is that, as I mentioned, you should only use softwoods. Trust me, you can experiment with hardwoods, but in my estimation, it’s just not worth the annoyance. Do it the right way. 


The other thing is that the wedge should be substantially longer than the depth of the tool head, or, if it isn’t, it should at least be significantly longer than the channel you cut in the tool handle. 


That is, you should be able to drive it in to the bottom of the wedge channel, and an inch or two should still be sticking out the top. This will allow you to get a secure, strong fit.


The last thing you should know about making your own wooden wedges is that they should also be wider than the tool you are hanging. When you starting driving in the wedge, it should hang over the front and back of the tool head, or if you are hanging it in a different manner, over both sides. 


Set the Wooden Wedge


The next thing you need to do is set the wooden wedge in the channel. You can start this by hand, as shown in the picture below.

How to hang a tool handle.
The wooden wedge started by hand.

Once again, to drive the wooden wedge in, you’ll want to use a wooden maul. Using a steel hammer will just break the wedge prematurely. This job is hard enough, don’t make it harder. 


Set the wedge and drive it in with the maul. After a few strikes, the excess overhang will calve off the sides of the tool head, as shown in the picture below.

How to hang a tool handle.
After a few strikes, the excess material at the ends of the wooden wedge will start to calve off of it, leaving you with a perfectly sized wedge that stretches fully across the eye of the tool.

Keep driving and the excess will shear off and fall away. Then you’ll be left with a wooden wedge remnant that is perfectly sized for the wedge channel in the handle of the tool. 


Continue driving  it in until you can’t pound it in anymore. Now, you can switch to a steel hammer if you like. Pound the wedge until it is flat with the rest of the tool handle. Typically, the excess sticking out the top will fray or break away.

Once you drive the wooden wedge in, keep pounding it down until it starts to mushroom out and most of the excess will break away.

If it doesn’t, you can use a knife to trim the rest of what is sticking out the top away until it is level with the rest of the tool handle.

The wedge driven nearly all of the way into the eye of the tool.

Though you can’t tell it from the picture above, you should still have some of the tool handle protruding out of the top of the eye of the tool head.

In most instances, guides will tell you to use a saw to trim this away until it is level with the rest of the head. 


The reason they do this is that most other tool handles are designed in such a way that the tool head cannot slip down around the shaft towards the user’s hands, so the excess overhang at the top is not necessary. 


Since I am using an old sledgehammer handle, and technically, the head could be driven down towards my hands (with sufficient force) I’m going to leave this overhang at the top so that I don’t underdo it, in one dimension at least. 


You’re almost there: all that’s left is to set the steel safety wedge, or two, if you have them.


Set a Safety Wedge


The final step here is to set a steel safety wedge in the top of the tool handle so that it transects both the wooden safety wedge and the wooden stock of the tool handle itself. 


The purpose of the steel safety wedge is to further displace the wood within the eye of the tool as fully as possible. Basically, pressing the steel wedge in forces the wood in the eye of the tool out and against the eye under maximum pressure. This makes it effectively impossible to pull the head off. At least, it would take several hundred to several thousand pounds of force to do it.


There is a proper way and an improper way to do this, though pretty much any method will technically get the job done. The right way to do it – by the books – is to set the wedge on a diagonal so that it cuts across the grain of both wedges in two dimensions instead of one. 


If you set the wedge perfectly parallel or perpendicular to the grain, you run the risk of creating a crack and a void. Setting the safety wedge on an angle creates maximum displacement and discourages cracks and voids from forming. Instead, typically what happens is the wood expands out against the tool’s eye, more or less perfectly. 

How to hang a tool handle.
Set the steel safety wedge across the grain of both the wooden handle and the wooden safety wedge. On an angle like this, it will cause maximum displacement and create the surest fit. Setting across both pieces of wood will reduce the likelihood of the steel wedge backing out.

To get the safety wedge in the top of the tool, I use a drilling hammer to get it started in there, and then I finish the job with a large steel pin punch.

The pin punch helps me force the wedge in farther than I would be able to using only the hammer alone, and in some cases, I can actually force the wedge under the surface level of the wood, under even greater pressure. 


This is what it looks like when it’s done.

How to hang a tool handle.
The steel safety wedge fought me a little so it isn't set as far across the wooden wedge as I'd like, but again, since this is an improvisation job, it'll work. If anything, this is a procedural flaw and not a material one; there are no voids in the handle or the wedge and the tool handle is fairly tightly wedged within the eye of the tool.

As you can see, although there are very, very minor gaps in two places between the handle and the side of the tool head’s eye, the handle more or less entirely fills the eye. It is under great pressure and there is little risk if any that the head will separate. 


Also, the froe is not a striking or swinging tool, so this is hardly an issue. On an ax or a sledgehammer I might be slightly more particular, but if the head ever comes off of this thing, it shouldn’t be a problem because I won’t be swinging it. I could just rehang it anyway.


One more note. Some producers use two steel wedges to displace even more wood. That is an option here but due to the nature of how a froe is used I see little cause for concern. This job is an improv job but I think it will suffice. 


You may have heard how glowing I was in my praise of the Cold Steel Trail Boss because Cold Steel uses two safety wedges in its construction, but in this case, I think one is more than enough. 

Inspect Your Handiwork


That’s basically all there is to it, and as you can see, you often need little more than what you can find in the shed or garage to hang a tool with a new handle. 


I scavenged the handle and shaped the wedge, and truth be told, if I was in a bind, I would have been able to improvise the steel safety wedge too, but I have quite a few spares in my tool boxes so I was not for want of commercially provisioned options. 


Anyway, now it is my sincere hope that you’ll never need anyone’s help replacing a tool handle again! 


Be safe. 


~The Eclectic Outfitter

Leave a Reply

Your email address will not be published. Required fields are marked *

Eclectic Outfitter